How to build a user research highlight reel without losing context

Dylan de Heer

A useful user research highlight reel brings a small set of reviewed excerpts together to explain a finding. Start with the question your audience needs to answer, select passages that support or challenge the finding, preserve their context, and check the finished edit against the original sessions.
The reel is a way to communicate research you have already examined. It should not become the process for deciding what the research means. If you choose the most dramatic moments first and build a conclusion around them, you can produce a persuasive presentation that poorly represents the evidence.
This guide walks through a practical workflow for product and UX teams. It works with screen or camera recordings when you have them, and with audio excerpts or text cards when you do not. The worked scenario is fictional, not a customer case study.
What belongs in a research highlight reel?
A highlight is a selected passage from a research session. A reel arranges several passages for an audience, usually with enough framing to explain the task, observation or finding. UXtweak describes highlights as short extracts from a session that surface relevant user feedback or behaviour. Its guide to research highlights provides examples of that format.
Useful material might show someone explaining a workaround, encountering a particular obstacle, revising their initial answer, or succeeding under a different condition. The selection depends on the research question. A clip of someone saying “I like it” tells an audience little without knowing what they used, what they were asked and what happened next.
Keep three things distinguishable: what the participant said or did, your interpretation, and the action you propose. A transition card can state an interpretation. A participant quotation should retain their meaning. A proposed product change needs its own label rather than appearing as though the participant endorsed it.
1. Decide what the audience should understand
Write one sentence before opening an editor. For example: “The product team needs to understand why some participants hesitate before sharing a report.” That is a useful brief because it specifies an audience, a behaviour and a question.
“Show the best moments from the interviews” is less useful. It leaves selection to novelty, emotional force or the order in which you happen to find clips.
Decide where the reel will be used. A short introduction to a live readout can rely on discussion afterwards. An asynchronous update needs enough framing and supporting material to stand alone. UserTesting recommends planning the audience and selecting clips with the intended message in mind. Its highlight-reel guidance treats the reel as a way to communicate reviewed research.
For a first edit, choose a modest scope: one question, a few contrasting moments, and a clear next discussion. Set a duration budget appropriate to the meeting or channel, then cut repetition. There is no universal ideal length that overrides comprehension. A longer extract can be the right choice when the shorter version reverses or obscures the meaning.
2. Finish enough analysis to make a defensible selection
Before selecting clips, review the sessions relevant to the question. Make a brief evidence map: the finding, the sessions that support it, the sessions that differ, and the limitations of what you observed.
If that work is still missing, start with how to synthesise user research. A polished montage cannot substitute for comparing observations across the study.
Do not count clips as participants. Three excerpts from one interview remain evidence from one person. Likewise, three people repeating an idea after the same leading prompt do not necessarily provide the same evidence as three independently observed behaviours. Preserve the task and prompting conditions so reviewers can judge the basis of the finding.
This is also the point to separate recorded behaviour from recollection. “I usually export it” is a participant's account. Watching the participant attempt an export is an observation of that task in that session. Both can be useful; the reel should not make them look interchangeable.
3. Build a shortlist with source references
Create a private working list of possible excerpts. For each one, record the session identifier, participant alias, source start and end, relevant task, proposed claim, and any reason the passage might mislead when separated from its surroundings.
Keep this list with the research material. It lets another reviewer return to the evidence even after the reel has been shortened, reordered or exported. A filename such as “great-quote-final” does not provide that route back.
Use consistent criteria to select from the list:
Relevance: does the passage answer the readout's question?
Clarity: can the audience understand the words or behaviour without a long explanation?
Context: can you preserve the conditions that change its meaning?
Contribution: does it add a different observation, condition or perspective?
Sharing suitability: is this content appropriate for the intended recipients and channel?
Avoid choosing several excerpts that merely repeat a vivid phrase. A quieter passage explaining the cause, or an example that challenges your interpretation, may contribute more to the decision.
Include evidence that qualifies the finding
Suppose two participants hesitate because they cannot identify the latest report, while another uses a date label successfully. That contrast can help the team ask a sharper question about version information. Removing the successful case to make the problem seem universal would weaken the readout.

You do not need an artificial “opposing view” in every reel. Include variation when it exists and matters. When you cannot establish how broadly an observation applies, describe its scope rather than filling the gap with a confident generalisation.
4. Set boundaries that preserve the answer
Return to the original session before finalising each excerpt. Listen to the preceding question and the following response. Check references such as “this”, “they”, “before” and “usually”: their meaning may disappear outside the conversation.
Leave enough lead-in to make the action understandable. If the participant initially struggles but then succeeds, decide whether showing only the struggle would misrepresent the task. If you shorten a long pause or remove a section, consider whether the edit changes the apparent ease, speed or certainty of the response.
Do not splice separate answers into a continuous statement. Use a visible break or a transition when moving between moments. Keep editorial explanation outside quotation marks, and label paraphrases as paraphrases.
For an audio-only session, do not add stock footage or invented interface screens that appear to show what the participant actually did. A plain text card, a clearly labelled illustration or a neutral background can support listening without manufacturing observational evidence.
5. Prepare the individual moments in Weeve
If the relevant interview is in Weeve, locate the passage and review it against the retained audio. Correct any transcription or speaker error before turning the text into a shareable moment. The interview highlights workflow covers working from a saved transcript to a selected excerpt.
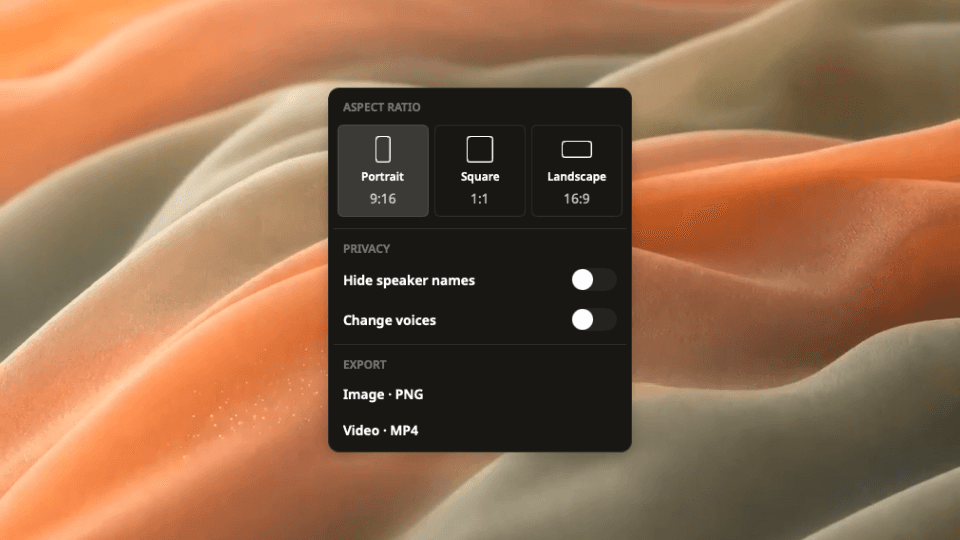
Weeve's Moments export menu offers PNG images and MP4 videos, with portrait, square and landscape formats. Video export requires retained audio. These are exports of selected moments; they do not recover camera or screen footage that was never recorded, and they do not automatically assemble several moments into a finished research reel.
For a slide-based readout, a quote card may be enough. For a reel, export the reviewed moments and arrange them in the editing application you use for the presentation. Keep the original session references alongside the exported files.
Check the privacy options in the exported result. Hide speaker names changes displayed attribution; it does not remove identifying details spoken in the recording or written inside a quotation. Change voices changes pitch in video exports, and a voice may still be recognisable. Treat these controls as specific presentation options, not a promise of anonymity.
Weeve supports local processing and optional external AI providers. Confirm the selected provider when using AI with research material, and make the separate decision about where exported files may be shared. A local working copy does not make an uploaded presentation local.
6. Arrange a sequence that makes the evidence easy to follow
Build a rough sequence before polishing transitions or backgrounds. A practical structure is: question, context, an illustrative observation, a useful contrast, then the implication and remaining uncertainty.
In a fictional report-sharing study, that could look like this:
Opening frame: “What helps participants recognise the current report?” Explain the task they attempted and the relevant study scope.
First excerpt: Participant 02 hesitates between two similarly named reports and explains what information is missing. Retain enough of the task to show which decision they face.
Second excerpt: Participant 05 describes a manual naming workaround. Explain whether this is a recollection or behaviour observed during the session.
Contrasting excerpt: Participant 03 uses a date label successfully. Keep the condition visible rather than presenting it as a contradiction with no explanation.
Closing frame: “Version cues appear relevant to this task. Review a clearer cue in the next design iteration.” Label that action as the team's proposal and link to the underlying findings.
The sequence gives each excerpt a job. It does not claim that a few clips establish prevalence across the customer base. If your study contains no relevant contrast, do not invent one; state the coverage you actually have.
Keep presentation choices subordinate to meaning
Use readable labels and predictable transitions. Avoid music, rapid cuts or decorative motion when they compete with speech or imply an emotional judgement. Keep speaker aliases consistent across the reel and the supporting document.
Check the final destination's framing. A portrait excerpt placed into a landscape slide may make text too small; a cropped screen recording may remove the control the participant is discussing. Test the exported file in the actual presentation size before calling it ready.
7. Review words, timing, context and disclosure separately
Watch the full export, not only the project timeline. Compare every selected excerpt with its source and ask a second reviewer to check passages carrying an important claim when possible.
Review the words and any captions for transcription mistakes, names, technical terms and missing negations. Then check timing: does each displayed passage correspond to the speech, and do transitions cut off part of an answer? If you provide a separate caption track, verify it in the intended player. Timed formats such as WebVTT use start and end offsets for their cues. The W3C specification explains that structure.
Do a separate context review. Can someone unfamiliar with the sessions distinguish observations from interpretations? Are different participants and different moments clearly separated? Does an excerpt still mean the same thing when viewed without the full interview?
Finally, inspect the entire frame and audio for material that should not travel to the intended audience: names, account details, notifications, third-party information or identifying anecdotes. Use the permissions and restrictions agreed for the study. If a passage cannot be shared appropriately, omit it or use an approved, clearly labelled summary; do not rely on a hidden speaker name to resolve every disclosure issue.
8. Deliver the reel with enough evidence to support discussion
Share a short written finding, the study scope and limitations, and a route to the underlying material for authorised reviewers. A text alternative should communicate the substance rather than merely list clip titles. Keep source access narrower where the original sessions require it.
End with a decision or question the team can act on: what should be investigated, what should be tried, or which assumption remains unresolved. Avoid asking the audience to infer the next step from a dramatic final quote.
The final check is simple: could another researcher trace the excerpts, understand why they were chosen and challenge your interpretation? If the answer is yes, the reel can support a useful conversation while preserving the evidence behind it.

